How to replace the car battery on a BMW X2
Changing a car’s battery is usually a very easy job, but some cars require quite a bit of extra work to extract and refit their batteries. Like the BMW X1, the BMW X2 falls into this category. We describe the process, so you can decide whether you’d really want to replace your BMW X2’s battery yourself.


Power to the X
Most older BMWs had extremely easy-to-replace batteries, mounted in a recess behind the right rear wheel well. But, on newer BMWs (especially those that use a FWD-based architecture), the battery has been relocated to reside under the bonnet. Getting to it requires a fair amount of work, as it is hidden away under covers and close to some potentially delicate electrical pieces.
Related: The BMW X2 xDrive20d – an Acquired Taste (2018) Review
It's not a particularly difficult job, but it does require special tools, so replacing the battery of a BMW X2 is just as involved a job as it is with the mechanically identical X1. There’s an intricate arrangement of covers and structural braces installed over the battery, and a rather complex electrical system situated very close by, and they have to be removed or cleared before the battery can come out.
Top 3 things you need to know about the BMW X2.
That’s quite a lot of stripping involved just to get to the battery, followed by some careful maneuvering to loosen and extract it. Because some of the work involves a structural element of the car’s body, and due to the close proximity of critical electrical components, it’s advisable to rather get a professional to handle this job.
Nonetheless, we took the plunge and jumped into an X2’s engine bay, to show you just how much work this seemingly simple operation entails. We also explain why you need to have a chat with the car’s computers once you have the new battery in place...
Get an Instant Offer on your old car here
You will need:
1. A slim flat screwdriver
2. Flat nose pliers
3. 8 mm and 10 mm socket wrenches, ideally ¼-inch ratchet drive
4. 13 mm socket wrench
5. BMW CANbus-compatible OBD2 diagnostic scanner
Let’s get started!
1. The first step is to remove the ventilation tray cover, under which the battery is mounted. First, remove the rubber sealing strip (marked with red arrows below) by grabbing a hold of either end and “peeling it away” from the ridge upon which it is mounted.

2. Remove the locating pins (marked above and below with green arrows). This is an easy operation, for which you’ll need a medium-width flat screwdriver and small pliers. Use the flat end of the screwdriver to pry the centre pin loose as shown in the image, then pull the pin out with the pliers. The rest of the locating pin can now be removed without much effort.

3. Remove the ventilation tray cover. First, lift up its front edge, and then gently pull it towards the front of the car (using both hands) to dislodge it from its rear location groove. Be very careful with this operation, as this is a large plastic piece that may crack if bent too far. Once dislodged, let the cover rest on top of the engine, alongside the sealing strip. This is what the engine bay should look like by this stage:

4. Now we get to the final battery cover. To remove this plastic piece, unfasten the two bolts holding it down (circled in green) with an 8mm socket wrench – a spanner will work as well, but there isn’t a lot of room for the spanner to move. Once these bolts are removed, lift the final two pieces of the battery cover (marked by the purple arrows) straight up and set it aside. Try to keep these two parts together, because if they separate, you may struggle by the time you want to re-fit the cover.

5. The battery is now almost fully visible. You will notice a number of plastic boxes and wiring looms directly next to the battery (marked with yellow arrows): take care not to disturb these, as indiscriminate handling may loosen electrical junctions or damage control units. They are not your main worry at this point, though, because there’s yet more stripping to be done before the battery can come out.

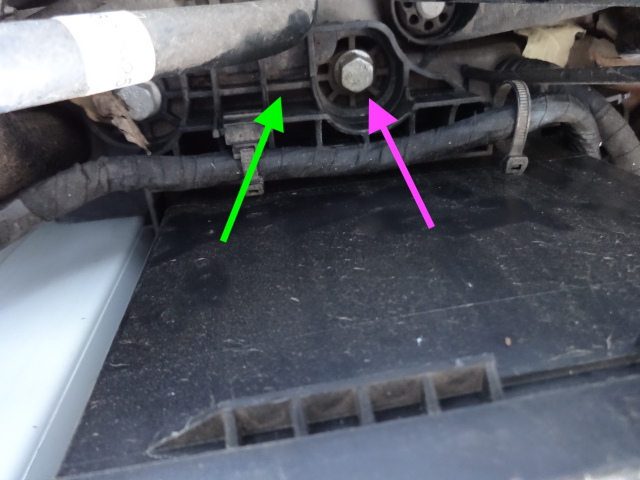
6. Marked with an orange arrow in the picture above is a structural brace, bolted to the firewall at one end, and to the strut tower at the other. This one also has to come out before the battery will have enough space to be lifted out of its tray. Using a 13mm socket wrench, remove the two bolts holding it in position (one of which marked with a yellow arrow below), and put it aside.

7. Here’s the easy bit: remove the battery terminals. Convention dictates that the negative (-) terminal gets disconnected first, followed by the positive terminal (+). This is done by loosening (but not removing) the 10mm nuts (marked with red arrows) which hold the terminals in place. Lift the terminals from the battery, tuck the negative terminal out of the way behind the battery, and suspend the positive terminal by hand. Just for safety’s sake, don’t let the positive terminal touch the body or engine, as there might still be control systems holding a charge elsewhere, and such contact might cause damage.

8. You’ve finally reached the point where you could access the battery’s mounting bracket (marked below by the green arrow). This is located behind the battery, and features a BMW-specific clamp which is fastened by another 13mm bolt (marked with the purple arrow). The battery bracket also locates a section of the wiring harness, so be careful not to pinch any wires in this area, and don’t put any strain on the wires, either.

9. The battery can now be lifted out of its location tray, by first sliding it about half a centimeter towards the windscreen, and then lifting it upwards. Always take care to avoid putting strain on any of the wires surrounding the battery!
10. Fit the new battery, and re-assemble in the reverse order of disassembly. Don’t worry, you won’t be able to fit the battery “the wrong way around”, because the terminals won’t reach, and the battery posts are of different sizes.
11. Finally, once everything is complete again and you’ve checked that the car starts, close the bonnet, and congratulate yourself on a job well done. Oh wait, not just yet...
That's not the end of it, though.
Yes, you've replaced the actual battery, but you'll also need to re-code the car's engine control unit - essentially, you need to tell the car that it has a new battery. Failing to do so increases the likelihood of electrical system malfunctions, and may be lethal to the new battery, alternator, and main electrical system.
This is easily done by means of a diagnostic scanner, but if you don't have access to (or are unable to operate) a suitable OBD2 scanning device, you'll need to phone a mobile technician (with the appropriate scanner) to come to you to re-code the control unit.
Why is this a necessary step? Starting around 2002, BMW refined their cars' electrical systems a great deal. The battery's charge rate is now controlled by a control module, which adapts to an aging battery by increasing the alternator's output over time. Just fitting a new battery to a car whose alternator charges as though it's connected to an old battery, will lead to over-charging of the new battery and could damage other electronic components in the process.

If you’re not completely at ease working on cars and don't have access to an appropriate diagnostic scanner, this operation likely won’t be within your abilities. But, if you enjoy a bit of a challenge and have the right tools at hand, you’ll be satisfied with overcoming this fairly intricate activity.
* This article was created as an advisory piece. AutoTrader SA does not accept any responsibility for possible damages incurred by individuals or workshops following these instructions. If in doubt, please consult a professional auto technician.


