The average lifecycle of a car battery is between four and six years, however, many factors will affect how long a vehicle battery will last before it needs replacement. Weather conditions, driving habits and even the vehicle type and how much power it requires from the battery will greatly affect the life expectancy of a vehicle battery.
If your Tata Bolt has been spending more time stationary as a result of remote working, this could have a negative effect on your battery. Cold climates during the autumn and winter months also do not help the situation. So if you find one morning that your battery does not want to power up or even charge, it is time for a replacement. The process however is not difficult, let us show you how it's done.

What do you need?
- Replacement battery of correct size and amperage.
- Ratchet with extension bit.
- 10mm socket.
Replacement steps
Step 1: Push the vehicle into a well-lit area with the help of a friend or family member.
Step 2: Ensure the ignition is set to “Off” and pull the bonnet lever located inside the vehicle.

Step 3: Locate the bonnet release latch and open the bonnet. Secure it in place with the support arm located on the passenger side of the bonnet interior.
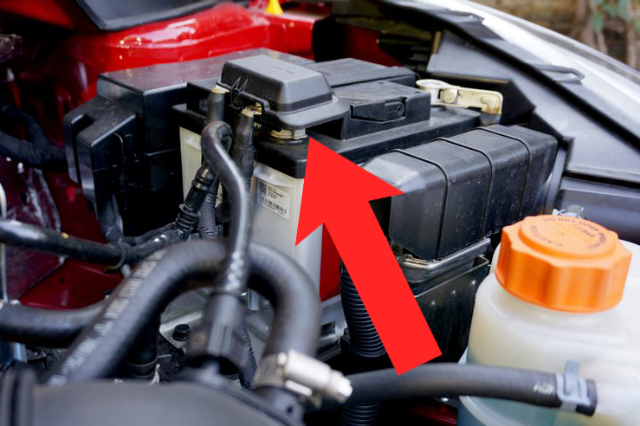
Step 4: Locate the battery on the passenger side of the engine bay.

Step 5: Using the ratchet with the 10mm socket, loosen the nut on the negative terminal situated on the right of the battery. The pole is indicated with a "-" symbol. Remove the cable and gently stow it away from the battery terminals.

Step 6: Using the same ratchet and socket combination, lift the plastic flap over the positive terminal indicated with a "+" and loosen the securing bolt. Remove the cable and gently stow it away from the battery terminals.
Step 7: At the base of the battery on the left-hand side, features a securing plate with two bolts. Using the 10mm socket attached to the extension bit on the ratchet, loosen both and remove the plate.

Step 8: You can now proceed to lift the old battery out of position and replace it with a new battery. Be sure to orientate the new battery so that the positive terminal is on the left and the negative terminal on the right.
Step 9: You can now proceed to securely tighten all the bolts in reverse order. Be sure not to over tighten as it could lead to the nut or bolt stripping which will require replacement.