
How to replace a lightbulb on a Mahindra Thar
There’s a definite advantage to having 1940’s design in a car, because it often makes it so much easier to perform basic maintenance procedures. Replacing a headlight bulb on a Mahindra Thar follows the same basic steps as many other cars, but because access is so easy, the whole job becomes a lot easier as well.



Nobody will ever accuse a Mahindra Thar of being sophisticated, but that old-fashioned design brings certain advantages when it comes to service access. The headlights are mounted in the front grille, and are easy to access on both sides when the bonnet is open, with no need to remove covers or ducting.
Related: The 5 cheapest REAL 4x4s.
Changing the light bulb – step-by-step
1. It’s easy to spot the headlamp connector with the bonnet open – it’s a black, squared-off block of plastic, located in the middle of a rubber boot (dust cover), indicated with a pink arrow in the picture below.

2. With a firm grip and a bit of wiggling, the plastic connector will slide off the headlamp bulb terminals. Move the connector aside when it’s disconnected, else it may get in the way in the near future.
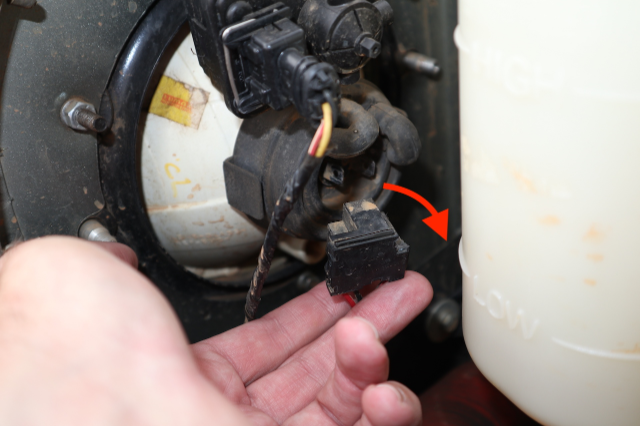
3. Peel off the dust cover by lifting it by one of its integral tabs and sliding it off the headlamp housing. The dust cover also covers the bulb terminals, so be careful when wiggling it off.
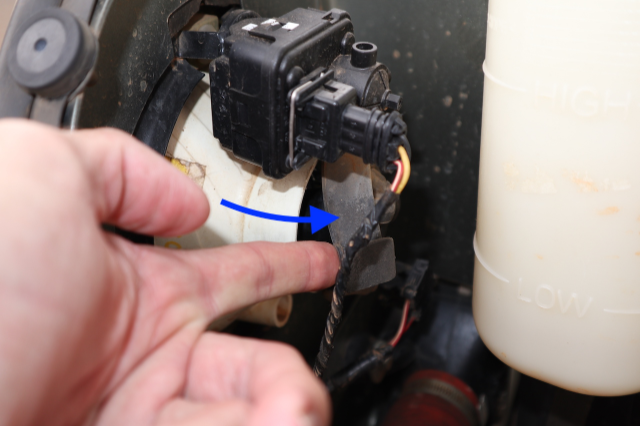
4. Put the dust cover aside in a safe spot. The headlamp bulb assembly is now open in front of you, and the only thing standing between you and pulling out that bulb is a little spring clip. Take the protruding part of the clip, first push it towards the headlamp housing and then lift it to the top. That’s the motion needed to unhook the bulb locating clip – it might take you a few tries to get it right, especially if you’ve never done this before...

5. With the spring clip pivoted out of the way, it’s time to remove the bulb itself. Take note of the three alignment tabs on the headlamp bulb’s base (marked with yellow arrows in the image), because the replacement globe will have to go in with the same orientation.
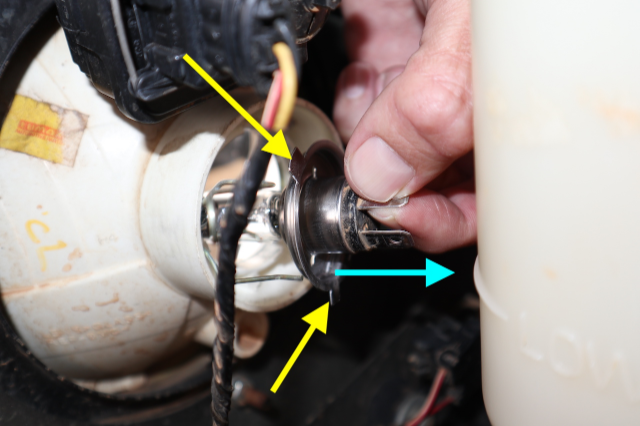
6. Slide the old bulb towards the rear of the car (in the direction of the blue arrow in the picture above) until its glass tip is clear of the housing, and then insert the new bulb in the correct orientation. Important: Don’t touch the glass section of the new headlight bulb! (Your fingers will leave an oily residue on the glass, which will lead to premature bulb failure).
7. Once you’ve hooked-in the spring clip and it is locating the new bulb properly, it’s time to re-fit the dust cover and re-connect the electrical connector. Once everything is in place and connected, test both low- and high beams by operating the vehicle’s headlight switch(es).

Related: We compare the Mahindra Thar to some other (relatively) inexpensive 4x4s.
Recommended next: